Dreaming of a cool, shaded oasis in your backyard? Sun shade sails are the perfect solution! With their sleek design and effective sun protection, they transform any outdoor space into a retreat. Plus, installing them is easier than you might think.
While the process might sound daunting at first, with the right guidance, it’s a fun and rewarding project. Whether you’re trying to reduce heat, add privacy, or simply enhance your home’s aesthetics, a shade sail offers versatile benefits.
Dive into this step-by-step guide that will walk you through everything—from choosing the right spot, gathering materials, to finally seeing your sail take wing in a gentle breeze. Ready to make your backyard the envy of the neighborhood? Let’s get started!
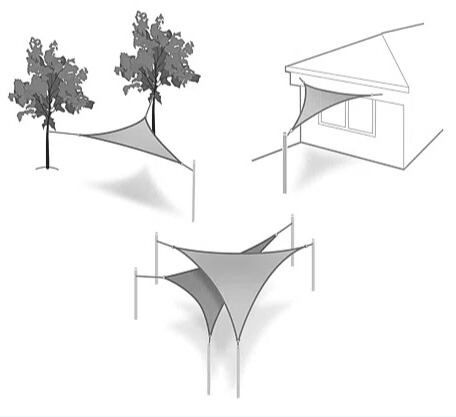
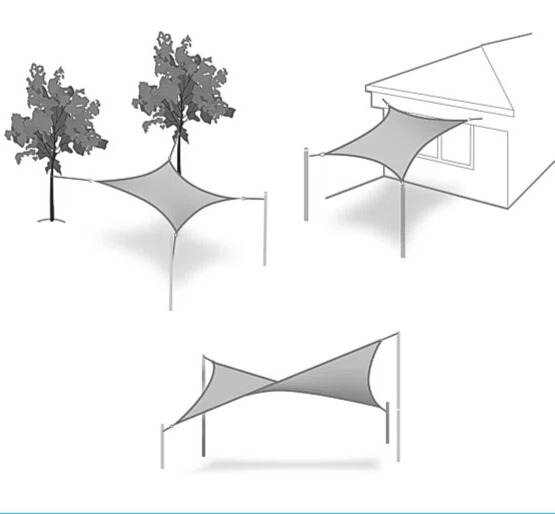
Choosing the Right Location for Your Sun Shade Sail
Before you start installing, selecting the ideal location is crucial for maximizing the benefits of your shade sail. Start by assessing the area you want to cover and consider factors like sun angle, wind patterns, and the presence of sturdy mounting points.
Sunlight and Coverage
Observe how the sun moves across your outdoor space. You want your sail to offer protection during peak sunlight hours. Take note of existing trees or structures that could help or hinder your coverage plans.
Wind Considerations
Consider prevailing wind directions to ensure stability and longevity. If you live in a windy area, positioning your sail to catch the least resistance can prevent undue stress on the fabric and anchors.
Finally, check for available mounting options, like walls, trees, or purpose-built posts. This ensures your sail will have proper support and a secure installation. By carefully choosing your spot, you’ll enjoy a shaded space that’s both practical and inviting.
Preparing the Area and Tools for Installation
Once you’ve picked the perfect spot, it’s time to prep your space and gather the necessary tools. Clear the area of any obstacles to create a clean working environment. This will make the installation process smoother and safer.
Next, assemble your toolkit. The essentials include a tape measure, ladder, drill, and a spanner or adjustable wrench. Depending on your mounting points, you might also need eye bolts, turnbuckles, and wall plugs or concrete anchors. Having everything at hand before you start can save time and reduce frustration.
Make sure to measure your designated area accurately. This ensures you have the right sail size and tension height. Precise measurements are key to an aesthetic finish and optimal shade coverage.
Before heading to the next steps, double-check that all your tools and materials are ready. This simple preparation now can make all the difference for a seamless installation later.

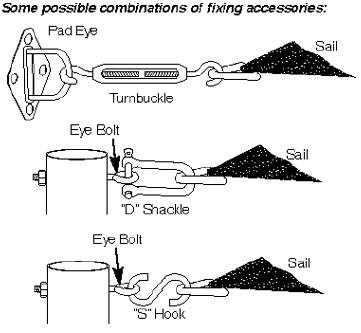
Mounting Points and Hardware Selection
Choosing the right mounting points is essential for a secure and long-lasting sun shade sail installation. Ideally, use existing structures like walls or sturdy trees. If they aren’t available, installing posts specifically for this purpose is a reliable alternative.
Ensure your chosen points can withstand the tension and weight of the sail. For heavier or larger installations, consider consulting a professional to evaluate the structural integrity of the mounting options.
Selecting the Proper Hardware
Your hardware choices depend on the materials and layout of your site. Eye bolts are great for firm attachments, while turnbuckles allow easy tension adjustments. If fastening to a wall, use suitable plugs or anchors to ensure a firm hold.
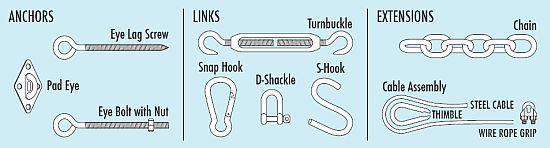
For posts, opt for galvanized steel or wood treated for outdoor use to prevent corrosion or rot. The right hardware selection enhances both the function and durability of your sun shade sail, ensuring it stands up to elements while providing consistent coverage.
Remember, investing in quality hardware now saves you from future headaches and keeps your outdoor space looking effortlessly chic. With these steps, you’re well-equipped to tackle the main installation process smoothly.
Step-by-Step Installation Process
With your preparations complete, it’s time to bring your sun shade sail project to life. Begin by laying out your sail on the ground to ensure everything is oriented correctly. This helps you visualize the final setup and confirm the positioning.
Next, attach the mounting hardware to your pre-selected points. This might involve drilling into walls or affixing hardware to sturdy posts. Ensure everything is securely fastened to bear the sail’s weight.
Once your hardware is in place, begin by connecting one corner of the sail. Secure it in the chosen position using the appropriate fixings. Gradually work your way around the sail, securing each corner. A partner can be helpful here to manage tension as you go.
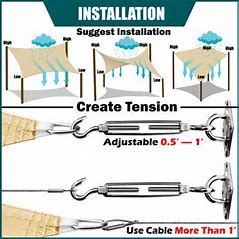
Adjust tension using turnbuckles or similar mechanisms, making sure the sail is taut without overstressing the fabric. The goal is a firm grip that withstands weather elements while maintaining smooth lines.
Finally, step back and admire your work! Test the sail by gently pushing to ensure it holds firm. Regular checks and adjustments will keep your setup looking great and functioning well over the long haul. Enjoy your new shaded haven!
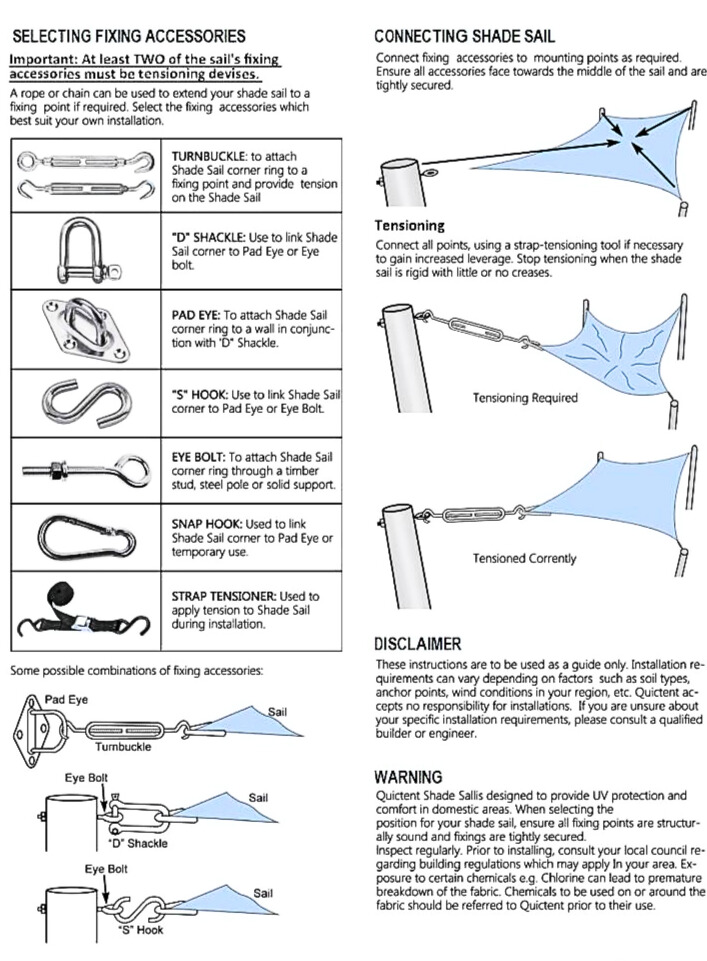
Making Adjustments for Proper Tension
Achieving the correct tension is essential to ensure your sun shade sail remains secure and visually appealing. Start by examining each corner, looking for sagging or excessive tightness. A sail that’s too loose may flap in the wind, while one that’s too tight can cause unnecessary stress on the fabric and mounting points.
Adjust the tension incrementally, using turnbuckles or similar hardware. Make small changes, checking the result each time. This gradual approach prevents overcorrection and helps maintain even tension across the sail. Remember, a taut sail not only looks better but also performs optimally by effectively withstanding wind and rain.
Throughout the year, environmental factors like temperature changes and weather conditions can impact your sail’s tension. Periodic checks ensure long-lasting performance. Tighten or loosen the setup as needed to adapt to these changes.
By keeping an eye on the tension and making adjustments as needed, you’ll preserve the integrity of your sun shade sail, extending its life and maintaining that perfect outdoor space for relaxing and entertaining year-round.
Testing the Sun Shade Sail for Stability
With your sun shade sail installed and tensioned, it’s crucial to test its stability. Start by inspecting all mounting points and hardware connections. A visual check ensures everything is secure and as planned.
Gently apply pressure to different sections of the sail. It should hold firm without too much give. This test simulates wind conditions and helps identify any potential weak spots needing reinforcement.
Keep an eye on the sail under varied weather conditions. A stable sail will display minimal movement in light winds and no sagging when wet from rain. If adjustments are needed, make them promptly to prevent wear and tear.
Lastly, regularly scheduled checks throughout the year will keep your sail in top condition. Seasonal maintenance ensures ongoing stability and optimal performance, allowing you to relax and enjoy your newly shaded area with peace of mind.
Maintaining Your Sun Shade Sail for Longevity
To ensure your sun shade sail remains in top shape for years, regular maintenance is key. Begin by cleaning it periodically to remove accumulated dirt and debris. Use a gentle detergent and soft brush to preserve the fabric’s integrity without causing damage.
During autumn, keep an eye out for fallen leaves or debris caught in the sail. Regularly clear these away to prevent stress on the material and mounting points. This helps maintain both the appearance and function of your setup.
In times of extreme weather or off-season months, consider taking down your sail if it’s not needed. This can protect it from potential damage caused by severe storms or heavy snowfall, prolonging its lifespan.
Routine inspections for wear and tear ensure any issues are addressed promptly. Check for frayed edges, weakened seams, or rusting hardware. Swift repairs not only enhance safety but also keep your sail looking fresh.
By dedicating a little time to regular care and maintenance, you’ll enjoy the comfort and protection of your sun shade sail well into the future, making it a worthy and lasting addition to your outdoor space.
Conclusion: Enjoying the Benefits of a Well-Installed Sun Shade Sail
With your sun shade sail successfully installed and maintained, you can now bask in the comfort of your upgraded outdoor space. Whether you’re hosting a summer barbecue or simply enjoying a quiet afternoon with a good book, the benefits of a well-installed shade sail are both immediate and long-lasting.
Not only does it provide relief from the harsh rays of the sun, but it also adds a touch of elegance to your garden or patio. The cool, shaded area becomes an inviting retreat, perfect for relaxation or entertaining guests.
And another thing to keep in mind is that, the thoughtful installation and diligent maintenance you’ve carried out ensure that your investment remains a staple feature for years to come. This proactive approach not only guards against potential damage but also saves you time and money in the long run.
Take a moment to appreciate the space you’ve transformed. It stands as a testament to the care and effort you’ve invested in enhancing your home. The blend of functionality and style offered by your sun shade sail makes it more than just a practical addition; it’s an expression of your commitment to crafting a personal oasis.
In summary, you’ve not only elevated your outdoor living experience but also contributed to your home’s overall ambience and value. Now, all that’s left is to invite friends and family to share in your shaded sanctuary, creating cherished memories under the comfort of your perfectly-installed sun shade sail. Enjoy every moment!